
DIY Hell!
- Steven Anthony Charles

- Sep 9, 2020
- 7 min read
Do it yourself. No! I don't want to, but I'm married to a woman who is all about DIY. In fact, she is so into it, she has her own YouTube channel (Dani Tutorials) where she makes all sorts of things. She gets very excited about DIY and I often get sucked into it against my better judgement (and total lack of DIY skill). My philosophy is simple: If I can't afford to pay someone to do it, then I just won't do it. Not only is this cost effective in the sense that I don't overextend myself, it saves me my most precious commodity: time.

As you can tell by the title of this blog, I lost the the battle with my wife and engaged in a time consuming, back breaking, soul sucking project to remodel our pantry. Was this really necessary? According to my philosophy, absolutely not, but according to my wife's philosophy of making everything "cute" it absolutely was. You can see the partially empty pantry here and while it is messy and utilitarian, you can easily access the food and store ridiculous amounts of paper products and sugar (why do I have so much sugar) as well as a wide range of Nutella and pasta products (my kids are destined to have diabetes by age 18). The pantry is fairly large and by my estimates, it will cost upwards of $1,000 to update it. If you add in the time cost, you can triple that amount (my time is valuable!)
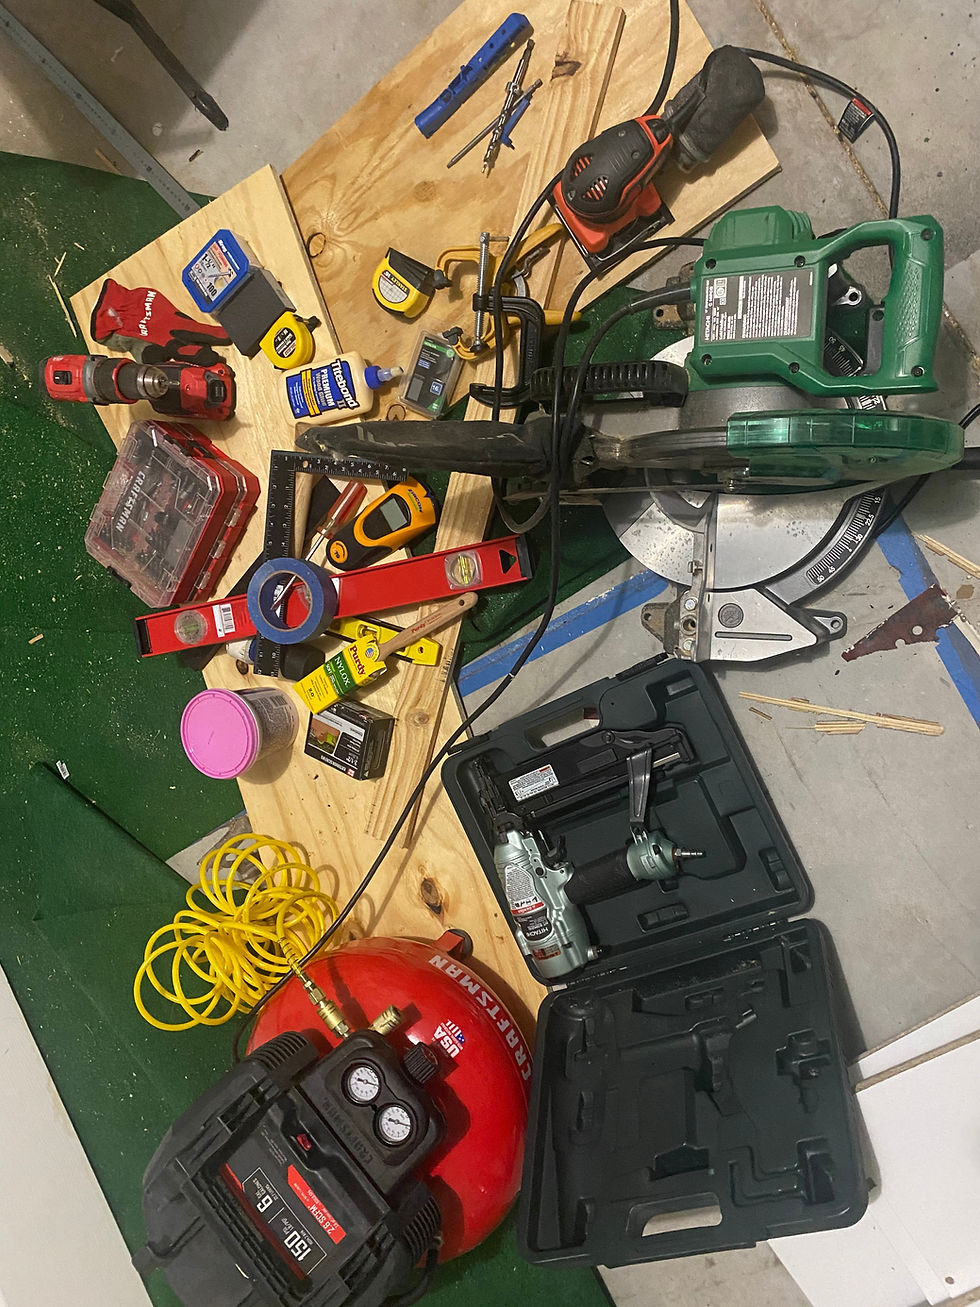
Why, you ask, do I have so many tools and power tools if I hate DIY? Because what kind of guy doesn't like tools. I've been playing with tools since...never mind.
In reality, if I don't count the tools that I had to buy, the renovation cost in materials was around $225, give or take a little due to my inability to save my receipts. How long it took is a bit nebulous as the idea to DIY our pantry came at 5PM on a Saturday and I spent the rest of the day measuring, doing math and scouring Lowes. I got to Lowes about an hour before closing and while I found everything and had a very helpful Lowes associate cut my wood, I wasn't done until they were closing the doors and rushing me out the door. What did I need? I had some of these items like some leftover paint, nails, sandpaper and some other painting accessories and I had most of the tools. Here is a maybe complete list:
Supplies
½ inch 3 ply plywood (for shelves)
1x3 wood planks (for shelf support)
1x2 planks (for edges)
2 ½ wood screws
Pocket screws
Black paint
White paint (not really white, but in the family)
Drop cloths (plastic)
Paint rollers
Paint brushes
Varnish
Finishing Nails
Sandpaper
Painter's Tape
Tools
Drill
Various drill bits
Kreg Pocket Hole Jig
Miter Saw
Tape measure
Rubber Mallet
Nail Gun
Level
Safety Glasses
Clamps
Sander and sandpaper
Work gloves
Stud Finder
Framing Square
As you can already imagine, with all the supplies and tools needed, a great deal of knowledge,
skill and experience must have been needed to work on this DIY project. You would be right, but in lieu of all that, I just used YouTube. Not only did I use YouTube, I only watched one video.
Sure, I watched it 100 times, but it had everything I needed. The YouTuber is called Living Redefined and he made it seem so easy. Sure, he didn't go into the specifics on how he managed to make everything line up perfectly or how he dealt with warped wood (all the wood I bought was warped) or how he didn't break into an uncontrollable sweat while he worked (maybe that is just me and my overactive sweat glands) but he provided enough information for my wife to think that I was capable and able to update our pantry.
Another piece of advice I would give is don't have a few drinks before you work out all the dimensions of your project. I did and I ended up buying 6 planks of plywood when I only needed 2. I bought three times as much wood as I needed.
I'd love to go into specifics on how I managed, but since I am completely unoriginal and only followed the aforementioned YouTube video, that would be redundant. I suggest you watch the video above. What I can tell you is all the mistakes I made so if you take on this project, you may be spared these mistakes through my sacrifice.
Let me start with measuring. This seems like a simple thing and generally, it is, until you need to slide a piece of plywood that is a few millimeters too long into place and it gets stuck and you end up messing up the paint so badly, you have to repaint. I honestly don't get measuring. I get it in theory, but in practice, I always get it wrong, but usually by the barest of margins. My pieces are either JUST a little too big or just a little too small. Another piece of advice I would give is don't have a few drinks before you work out all the dimensions of your project. I did and I ended up buying 6 planks of plywood when I only needed 2. I bought three times as much wood as I needed. Since I don't have a table saw or hand saw, I had the nice man at Lowes cut the 8x4 pieces of plywood for me (36 cuts in all). My pathetic excuse for planning and measuring just ensured that I would be forced to complete many, many, many more DIY projects to get rid of the 24 extra pieces of cut plywood I now have sitting in my garage. F*ck me!

What else went wrong? Shelves four and five were wildly crooked, but thanks to my OCD, I meticulously remeasured and fixed it (ok, I eyeballed it and redrilled a few holes...I was done with my faulty measuring!) See, you can't even tell that my support beams aren't straight (maybe this picture was taken after I fixed it.) As I mentioned above, I made a mess of this nicely painted wall and it had to be touched up pretty significantly. The DIY guru in the video said he wished he had painted before he put the shelves up because of how hard it was to paint once it was finished, but I think he is a bit presumptuous when it comes to the skill of us normal people.

Once I got past putting up the supports, it should be a piece of cake, right? Wrong. While my initial measurements were certainly in the ballpark, I didn't take into consideration the slight differences in length for each shelf due to crappy construction by my home builder, DR Horton. I swear, every wall, floor and ceiling was built by a cross eyed construction worker with balance issues. So I needed to trim some of the shelves to get them to fit but I only have a miter saw which is great for cutting 2x4s and other narrow pieces of wood. It only has a cutting width of about 6 inches and the shelves were 15 inches wide, so I had to make the difference up with a regular old saw. Needless to say, it isn't very accurate and the cuts jagged and uneven. An electric sander smoothed out some of the ugliness and luckily, you can't really see the butcher job I did on the shelves in the finished product because they are hidden by darkness and food. The real trick was the corners. I had to drill pocket holes (WTF are those!) to attach the long and short shelves. In the video, our intrepid DIYer uses additional supports, but my wife thought they looked ugly and preferred the entire pantry along with all the food to crash onto the floor in the middle of the night. I (hopefully) compensated for the lack of supports by drilling 5 pairs of pocket holes for each connection. This was the first time I had ever done this type of woodwork and if you look closely, you'll notice that I drilled pocket holes on both side even though I only needed them on one side. Why? Because I drilled holes for 3/4 inch wood instead of 1/2 inch wood. Oops. Again, darkness and lots and lots of food are hiding these mistakes.
What is probably not noticeable in the above picture, unless you have a very keen eye, is how

warped the wood is. I didn't notice and I was standing right there until it came time to add the finishing touches like the end caps for all the shelves. I don't know if the end caps were crooked or the plywood was crooked or both, but when I began to put on the end caps, I wanted to cry. I couldn't get them to stay on for the life of me. That's when I went rambo on those motherfers and used my nail gun to FORCE them into place. I put a finishing nail every couple of inches, and little by little, they straightened out. YAY for power tools! The end product actually looks unlike I expected. Sure, I expected it to look like sh*t, but in the end, it turned out to be a passable DIY. With all the food back in the pantry, you might even say it looks professional!

This DIY Pantry project has allowed us to organize our pantry and with some extra shelves, given us a lot more space. You may notice that the containers weren't there before and you would be right. My wife almost spent as much on containers as I spent on wood that I didn't need, so who am I to complain and they do look good. Now, when the kids sneak into the pantry to steal snacks, instead of open bags of Doritos and pretzels all over the floor, they leave opened containers on the floor...much easier to clean up.
In the end, it wasn't as bad as I made it out to be, though it did take me all day Sunday, and all my time after work on Monday, Tuesday and Wednesday. If I were at all skilled, I probably could have finished it on Sunday, so if you are handy, you can do this in one day. If you can measure accurately and you know how to count, you can do it faster than me. If you...you get the picture. Speaking of pictures, check out the gallery below for some more pictures from my ordeal.


This has got to be the funniest thing I have ever read. It is funny because it is so accurate. I have never actually tried to build anything, but I have put up pictures, rods, wall paper and painted many times. When my children were young, there was always toys to put together. I remember one Christmas when I was still putting toys together when the kids got up expecting to see everything under the tree. These experience was never easy or fast, but I always considered them fun when I was all finished.
. I congratulate you not only in making the pantry look so good but in giving all of us a good laugh. You brightened my day.